
| 일 | 월 | 화 | 수 | 목 | 금 | 토 |
|---|---|---|---|---|---|---|
| 1 | 2 | 3 | 4 | 5 | 6 | 7 |
| 8 | 9 | 10 | 11 | 12 | 13 | 14 |
| 15 | 16 | 17 | 18 | 19 | 20 | 21 |
| 22 | 23 | 24 | 25 | 26 | 27 | 28 |
| 29 | 30 |
- 유니티 심화과정
- 다이나믹 프로그래밍
- 2023년
- 유니티
- 10월
- 입문
- 백준
- 6월
- 2월
- 코딩 테스트
- todolist
- 골드메탈
- 기초
- 수학
- 1월
- 자료 구조
- c++
- 코딩 기초 트레이닝
- 게임 엔진 공부
- 단계별로 풀어보기
- 4월
- 프로그래머스
- C/C++
- 개인 프로젝트
- 2025년
- 5월
- 2024년
- 2022년
- 개인 프로젝트 - 런앤건
- 3월
- Today
- Total
기록 보관소
[Unity/유니티] 기초-3D 쿼터뷰 액션 게임: 코루틴으로 근접공격 구현하기[B43] 본문
개요
유니티 입문과 독학을 위해서 아래 링크의 골드메탈님의 영상들을 보며 진행 상황 사진 또는 캡처를 올리고 배웠던 점을 요약해서 적는다.
현재는 영상들을 보고 따라하고 배우는 것에 집중할 것이며, 영상을 모두 보고 따라한 후에는 개인 프로젝트를 설계하고 직접 만드는 것이 목표다.
https://youtube.com/playlist?list=PLO-mt5Iu5TeYI4dbYwWP8JqZMC9iuUIW2
유니티 강좌 기초 채널 Basic
유니티 개발을 처음 시작하시는 입문자 분들을 위한 기초 채널. [ 프로젝트 ] B00 ~ B12 (BE1) : 유니티 필수 기초 B13 ~ B19 (BE2) : 2D 플랫포머 B20 ~ B26 (BE3) : 2D 탑다운 대화형 RPG B27 ~ B37 (BE4) : 2D 종스크롤
www.youtube.com
3D 쿼터뷰 액션 게임: 코루틴으로 근접공격 구현하기[B43]
1. 변수 생성
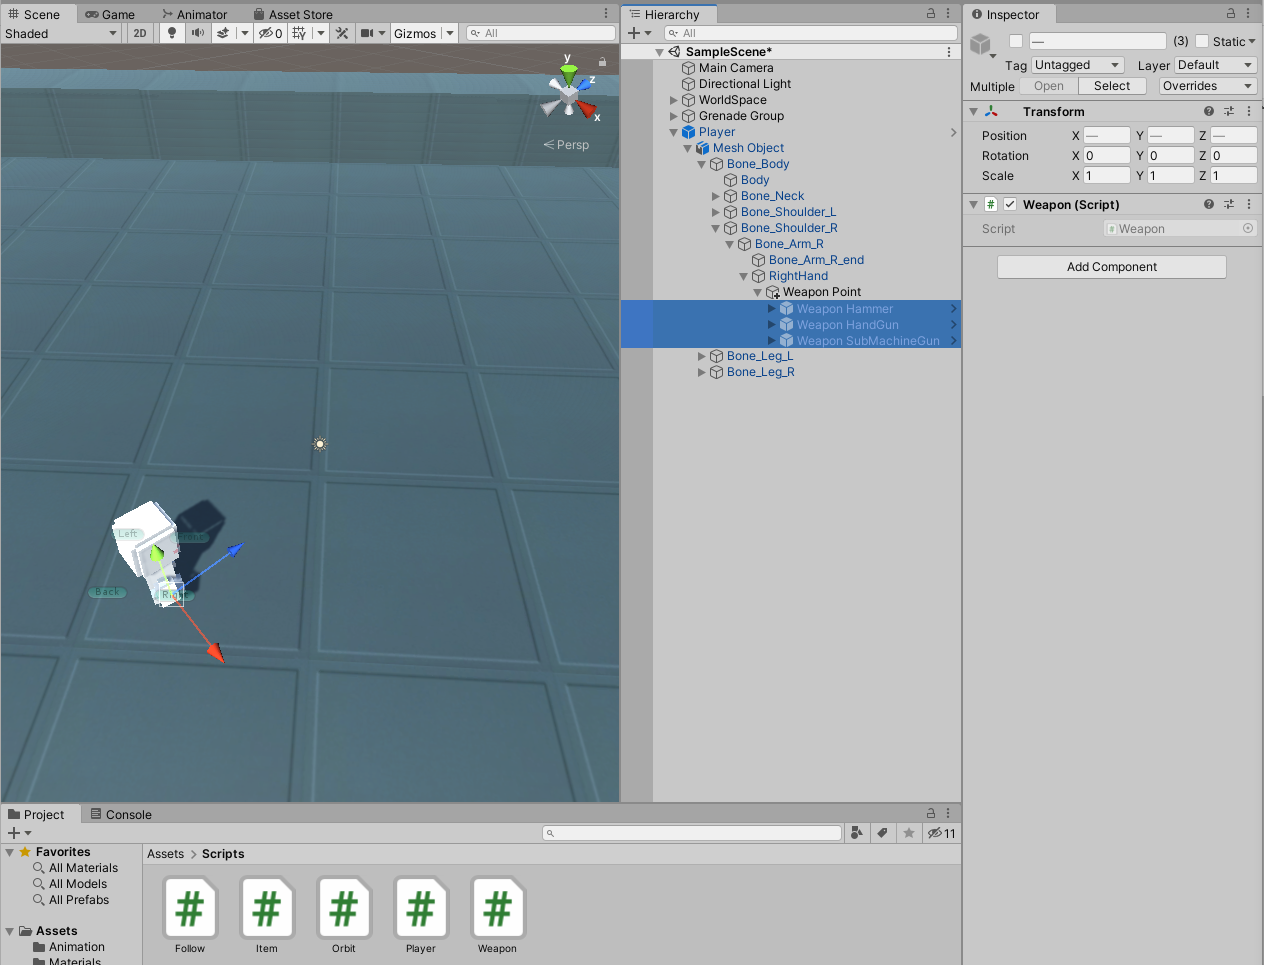
//Weapon 스크립트 파일

using System.Collections;
using System.Collections.Generic;
using UnityEngine;

public class Weapon : MonoBehaviour {
    public enum Type { Melee, Range };
	public Type type;
	public int damage;
	public float rate;
	public BoxCollider meleeArea;
	public TrailRenderer trailEffect;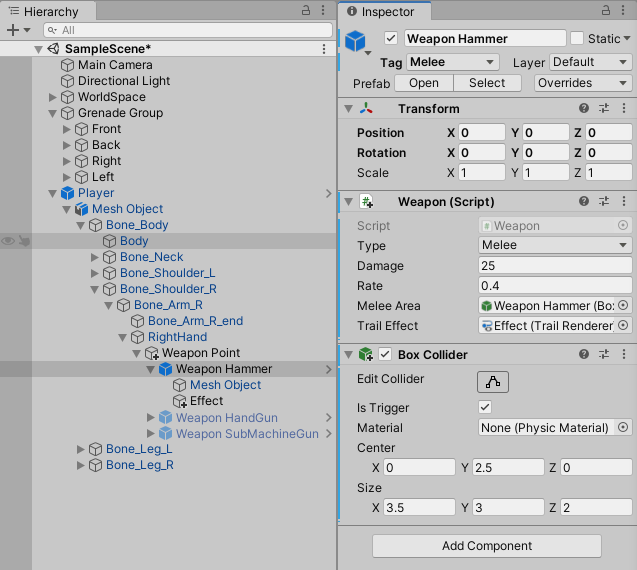
}- 무기 타입, 피해량, 공격속도, 범위, 효과 변수들을 각 장착 무기에 추가하였다.
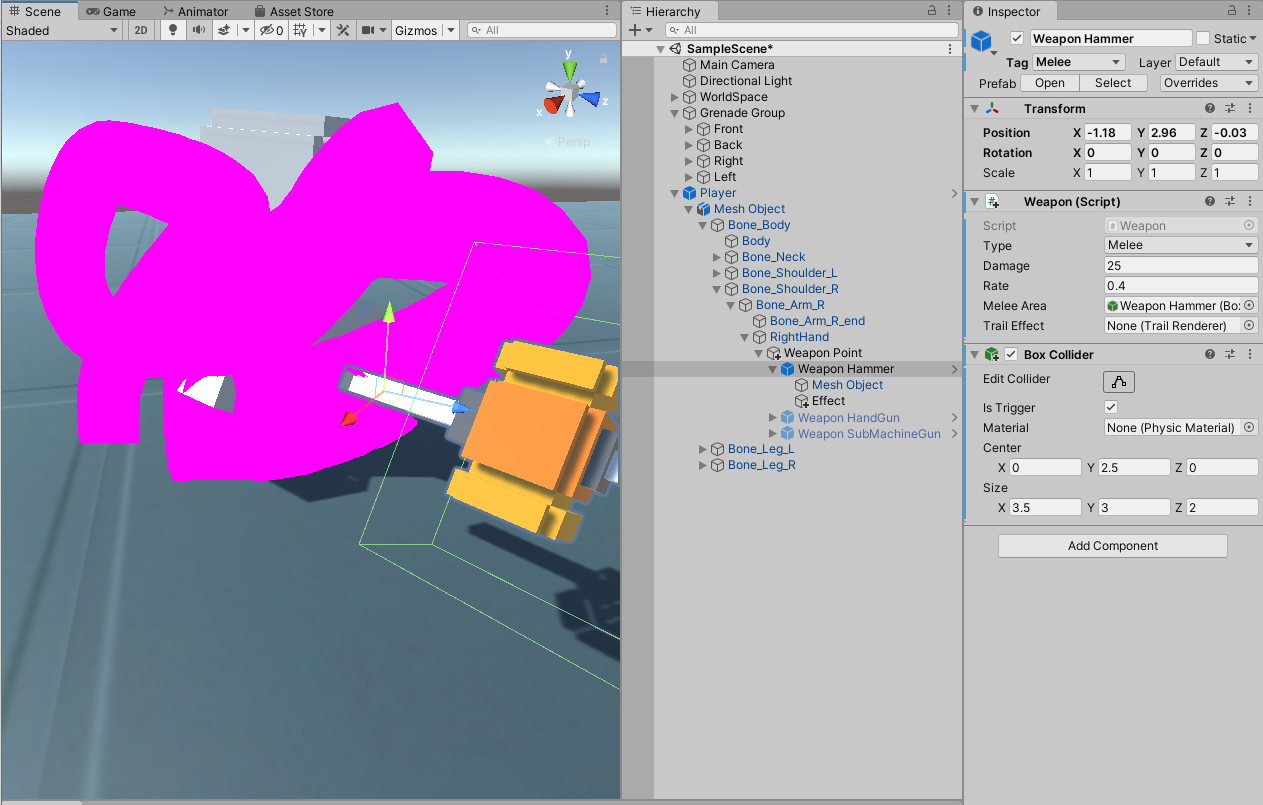
2. 근접 공격 범위

- 콜라이더 중심을 망치 머리로 잡아 범위를 설정하고 Is Trigger 체크를 한다. 그 후 앞에서 만든 스크립트 근접 공격 범위 변수에 자기 자신의 Collider를 할당해준다.
- 근접 무기이므로 구분을 위해 새로운 Tag로 Melee를 만들어서 설정한다.
3. 근접 공격 효과
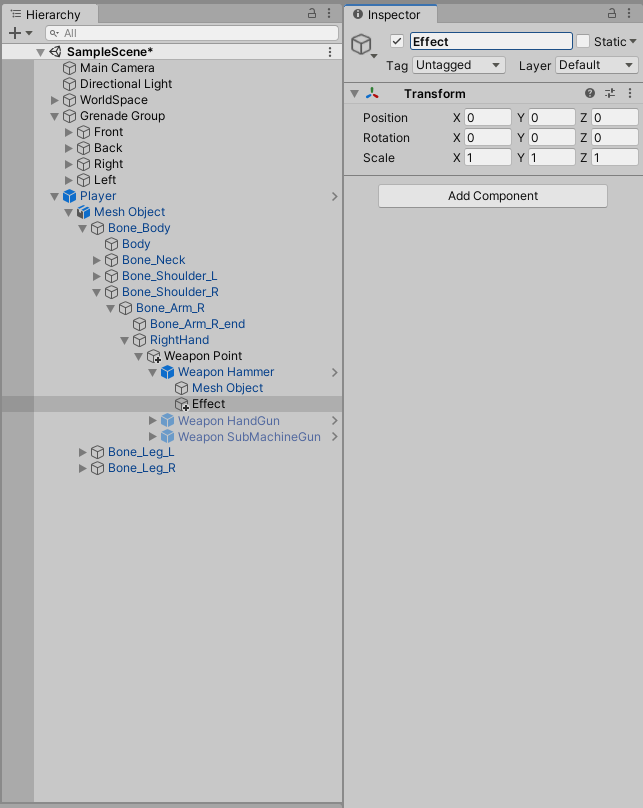
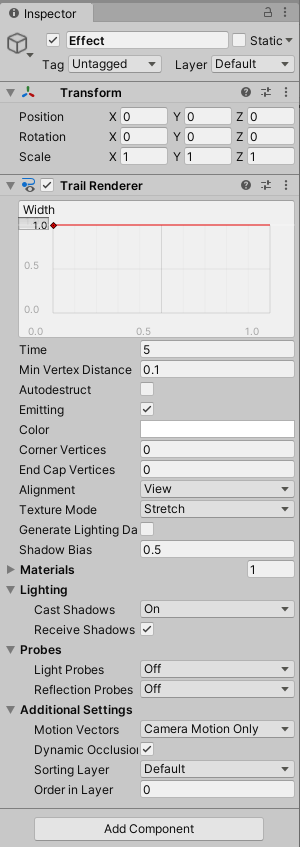
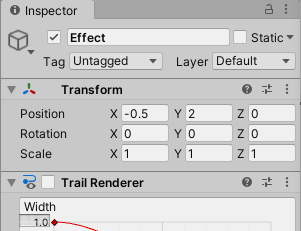
- Trail Renderer : 잔상을 그려주는 컴포넌트
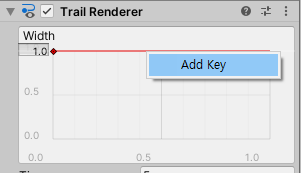

- 위 캡처처럼 잔상이 일정한 모양인 것이 싫다면 Width Curve에 Key를 추가하여 움직여 주면 된다

- Time은 이름대로 잔상 유지 시간이라고 보면 된다.
- Min Vertex Distance는 잔상 꺾임을 설정한다. 값이 커질수록 조금 더 각진 모습의 잔상이 출력된다.
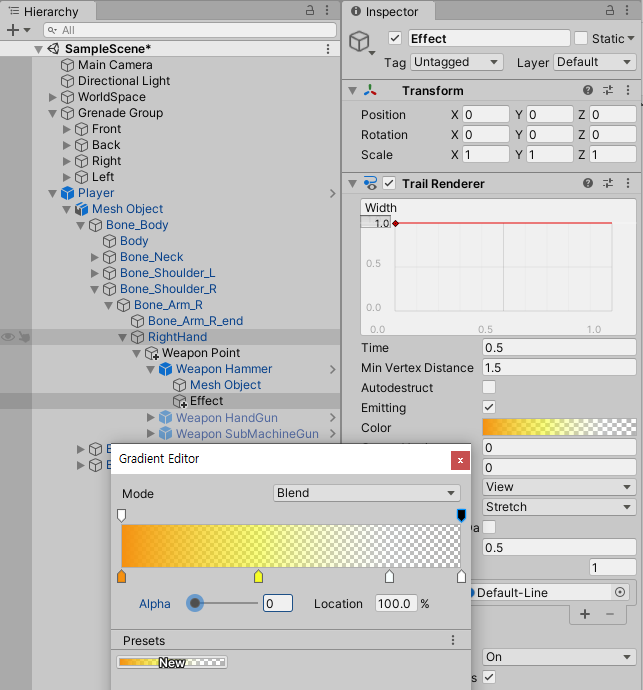
- Color은 파티클 이펙트처럼 설정할 수 있다.


4. 공격 로직(코루틴)
//Weapon 스크립트 파일

using System.Collections;
using System.Collections.Generic;
using UnityEngine;

public class Weapon : MonoBehaviour {
    public enum Type { Melee, Range };
	public Type type;
	public int damage;
	public float rate;
	public BoxCollider meleeArea;
	public TrailRenderer trailEffect;

	public void Use() {
		if (type == Type.Melee) {
			StopCoroutine("Swing");
			StartCoroutine("Swing");
		}

	}

	IEnumerator Swing() {
		yield return new WaitForSeconds(0.1f);	//0.1초 대기
		meleeArea.enabled = true;
		trailEffect.enabled = true;

		yield return new WaitForSeconds(0.3f);  //0.3초 대기
		meleeArea.enabled = false;

		yield return new WaitForSeconds(0.3f);  //0.3초 대기
		trailEffect.enabled = false;
	}
}- 일반 함수에서는 메인 루틴 -> 서브 루틴 -> 메인 루틴으로 교차 실행이 되었지만, 코루틴(Co-Routine)에서는 메인 루틴 + 코루틴으로 동시 실행이 된다.
- IEnumerator : 열거형 함수 클래스
- StartCoroutine(string methodName) : 코루틴 실행 함수
- StopCoroutine(string methodName) : 코루틴 정지 함수. 아래 yield 대기 시간 중인 것도 모두 멈춘다.
- yield : 코루틴에서 결과를 전달하는 키워드. null 리턴시 1프레임을 대기한다. 여러개를 사용해서 시간차 로직을 작성할 수 있다.
- WaitForSeconds(float seconds) : 주어진 수치만큼 기다리는 함수. 리턴시 대기 시간을 seconds로 변경할 수 있다.
- yield break : 코루틴 탈출. break 입력시 아래 함수들은 반투명하게 비활성화 되므로 사용시 주의해야한다.
5. 공격 실행

- Trigger형 매개변수 doSwing을 추가하고, 위 캡처처럼 Anystate -> Swing Transition을 설정한다. Swing -> Exit는 Transition Duration만 0.1로 바꿔주었다.
//Player 스크립트 파일

using System.Collections;
using System.Collections.Generic;
using UnityEngine;

public class Player : MonoBehaviour {
    public float speed;
	public GameObject[] weapons;
	public bool[] hasWeapons;
	public GameObject[] grenades;
	public int hasGrenades;

	public int ammo;
	public int coin;
	public int health;

	public int maxAmmo;
	public int maxCoin;
	public int maxHealth;
	public int maxHasGrenades;

	float hAxis;
    float vAxis;

    bool wDown;
    bool jDown;
	bool fDown;
	bool iDown;
	bool sDown1;	//망치
	bool sDown2;	//권총
	bool sDown3;	//기관총

    bool isJump;
	bool isDodge;
	bool isSwap;
	bool isFireReady = true;

    Vector3 moveVec;
	Vector3 dodgeVec;

    Animator anim;
    Rigidbody rigid;

	GameObject nearObject;
	Weapon equipWeapon;
	int equipWeaponIndex = -1;
	float fireDelay;

    void Awake() {
        rigid = GetComponent<Rigidbody>();
        anim = GetComponentInChildren<Animator>();  //Player 자식 오브젝트에 있으므로
    }

    void Update() {
        GetInput();
        Move();
        Turn();
        Jump();
		Attack();
		Dodge();
		Swap();
		Interation();
    }

    void GetInput() {
        hAxis = Input.GetAxisRaw("Horizontal"); //좌우 방향키
        vAxis = Input.GetAxisRaw("Vertical");   //상하 방향키
        wDown = Input.GetButton("Walk");    //shift 키
		jDown = Input.GetButtonDown("Jump"); //스페이스바
		fDown = Input.GetButtonDown("Fire1"); //마우스 왼쪽 클릭
		iDown = Input.GetButtonDown("Interation");  //E키
		sDown1 = Input.GetButton("Swap1");	//번호 1번 키
		sDown2 = Input.GetButton("Swap2");	//번호 2번 키
		sDown3 = Input.GetButton("Swap3");	//번호 3번 키
	}

    void Move() {
        moveVec = new Vector3(hAxis, 0, vAxis).normalized;  //normalized : 방향 값이 1로 보정된 벡터

		if (isDodge)	//회피 중일때는
			moveVec = dodgeVec; //회피하는 중인 방향으로 유지

		if (isSwap || !isFireReady)	//무기 교체 또는 무기 공격 중일때는
			moveVec = Vector3.zero;	//멈추기

        transform.position += moveVec * speed * (wDown ? 0.3f : 1f) * Time.deltaTime;

        anim.SetBool("isRun", (moveVec != Vector3.zero));   //이동을 멈추면
        anim.SetBool("isWalk", wDown);
    }

    void Turn() {
        transform.LookAt(transform.position + moveVec); //나아갈 방향 보기
    }

    void Jump() {
        if (jDown && (moveVec == Vector3.zero) && !isJump && !isDodge && !isSwap) {	//움직이지 않고 점프
            rigid.AddForce(Vector3.up * 15, ForceMode.Impulse);
			anim.SetBool("isJump", true);
			anim.SetTrigger("doJump");
			isJump = true;
        }
    }

	void Attack() {
		if (equipWeapon == null)
			return;

		fireDelay += Time.deltaTime;
		isFireReady = (equipWeapon.rate < fireDelay);

		if (fDown && isFireReady && !isDodge && !isSwap) {
			equipWeapon.Use();
			anim.SetTrigger("doSwing");
			fireDelay = 0;
		}
	}

	void Dodge() {
		if (jDown && (moveVec != Vector3.zero) && !isJump && !isDodge && !isSwap) {    //이동하면서 점프
			dodgeVec = moveVec;
			speed *= 2;
			anim.SetTrigger("doDodge");
			isDodge = true;

			Invoke("DodgeOut", 0.4f);
		}
	}

	void DodgeOut() {
		speed *= 0.5f;
		isDodge = false;
	}

	void Swap() {
		if (sDown1 && (!hasWeapons[0] || equipWeaponIndex == 0))	return;
		if (sDown2 && (!hasWeapons[1] || equipWeaponIndex == 1))	return;
		if (sDown3 && (!hasWeapons[2] || equipWeaponIndex == 2))	return;

		int weaponIndex = -1;
		if (sDown1) weaponIndex = 0;
		if (sDown2) weaponIndex = 1;
		if (sDown3) weaponIndex = 2;

		if ((sDown1 || sDown2 || sDown3) && !isJump && !isDodge) {
			if (equipWeapon != null)
				equipWeapon.gameObject.SetActive(false);

			equipWeaponIndex = weaponIndex;
			equipWeapon = weapons[weaponIndex].GetComponent<Weapon>();
			equipWeapon.gameObject.SetActive(true);

			anim.SetTrigger("doSwap");
			isSwap = true;
			Invoke("SwapOut", 0.4f);
		}
	}

	void SwapOut() {
		isSwap = false;
	}

	void Interation() {
		if (iDown && nearObject != null && !isJump && !isDodge) {
			if (nearObject.tag == "Weapon") {
				Item item = nearObject.GetComponent<Item>();
				int weaponIndex = item.value;
				hasWeapons[weaponIndex] = true;

				Destroy(nearObject);
			}
		}
	}

	void OnCollisionEnter(Collision collision) {
		if (collision.gameObject.tag == "Floor") {
			anim.SetBool("isJump", false);
			isJump = false;
		}
	}

	void OnTriggerEnter(Collider other) {
		if (other.tag == "Item") {
			Item item = other.GetComponent<Item>();
			switch(item.type) {
				case Item.Type.Ammo:
					ammo += item.value;
					if (ammo > maxAmmo)
						ammo = maxAmmo;
					break;
				case Item.Type.Coin:
					coin += item.value;
					if (coin > maxCoin)
						coin = maxCoin;
					break;
				case Item.Type.Heart:
					health += item.value;
					if (health > maxHealth)
						health = maxHealth;
					break;
				case Item.Type.Grenade:
					if (hasGrenades == maxHasGrenades)
						return;

					grenades[hasGrenades].SetActive(true);
					hasGrenades += item.value;
					if (hasGrenades > maxHasGrenades)
						hasGrenades = maxHasGrenades;
					break;
			}
			Destroy(other.gameObject);
		}
	}

	void OnTriggerStay(Collider other) {
		if (other.tag == "Weapon")
			nearObject = other.gameObject;
	}

	void OnTriggerExit(Collider other) {
		if (other.tag == "Weapon")
			nearObject = null;
	}
}


'유니티 프로젝트 > 3D 쿼터뷰 액션게임' 카테고리의 다른 글
| [Unity/유니티] 기초-3D 쿼터뷰 액션 게임: 플레이어 물리 문제 고치기[B45] (0) | 2022.03.27 |
|---|---|
| [Unity/유니티] 기초-3D 쿼터뷰 액션 게임: 원거리 공격 구현[B44] (0) | 2022.03.26 |
| [Unity/유니티] 기초-3D 쿼터뷰 액션 게임: 아이템 먹기 & 공전물체 만들기[B42] (0) | 2022.03.24 |
| [Unity/유니티] 기초-3D 쿼터뷰 액션 게임: 드랍 무기 입수와 교체[B41] (0) | 2022.03.21 |
| [Unity/유니티] 기초-3D 쿼터뷰 액션 게임: 아이템 만들기[B40] (0) | 2022.03.18 |


