
| 일 | 월 | 화 | 수 | 목 | 금 | 토 |
|---|---|---|---|---|---|---|
| 1 | 2 | 3 | ||||
| 4 | 5 | 6 | 7 | 8 | 9 | 10 |
| 11 | 12 | 13 | 14 | 15 | 16 | 17 |
| 18 | 19 | 20 | 21 | 22 | 23 | 24 |
| 25 | 26 | 27 | 28 | 29 | 30 | 31 |
- 골드메탈
- 2024년
- 코딩 테스트
- 4월
- 코딩 기초 트레이닝
- 백준
- 2023년
- 개인 프로젝트 - 런앤건
- 유니티
- 2022년
- 수학
- 7월
- 게임 엔진 공부
- 2025년
- 3월
- 2월
- 단계별로 풀어보기
- C/C++
- 자료 구조
- 입문
- 기초
- 10월
- c++
- 프로그래머스
- 5월
- todolist
- 1월
- 개인 프로젝트
- 유니티 심화과정
- 다이나믹 프로그래밍
- Today
- Total
기록 보관소
[Unity/유니티] 기초-뱀서라이크: 모바일 빌드하기[17] 본문
개요
유니티 독학을 위해 아래 링크의 골드메탈님의 영상들을 보고 직접 따라 해보면서 진행 상황을 쓰고 배웠던 점을 요약한다.
https://youtube.com/playlist?list=PLO-mt5Iu5TeYI4dbYwWP8JqZMC9iuUIW2
📚유니티 기초 강좌
유니티 게임 개발을 배우고 싶은 분들을 위한 기초 강좌
www.youtube.com
뱀서라이크: 모바일 빌드하기[17]
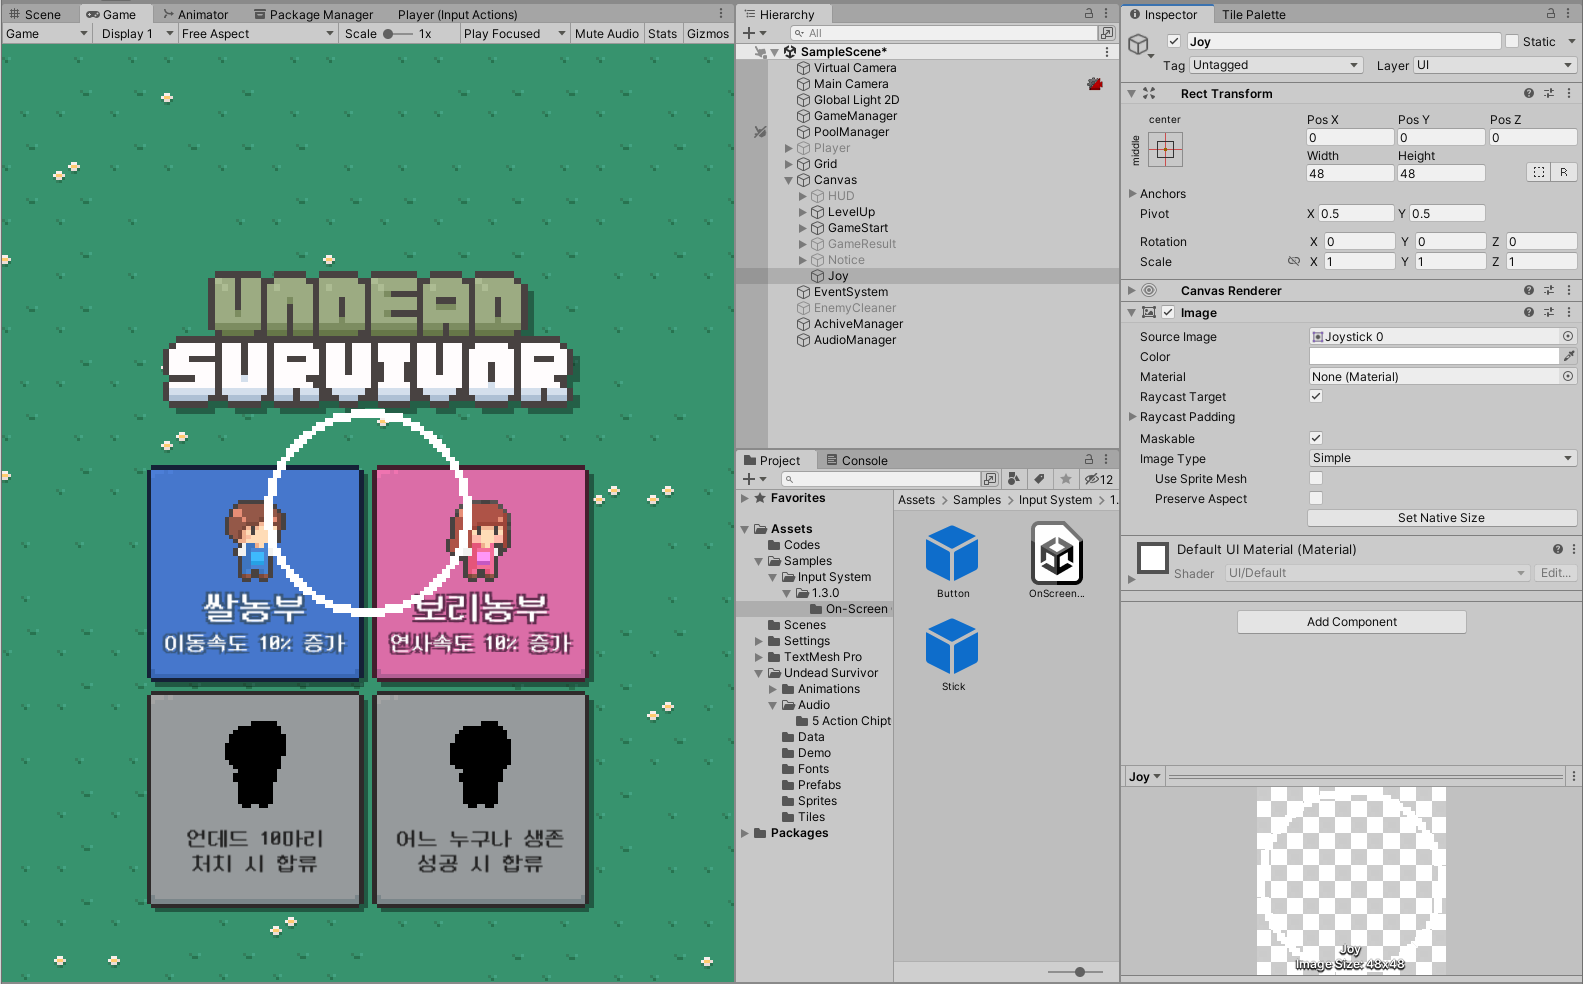
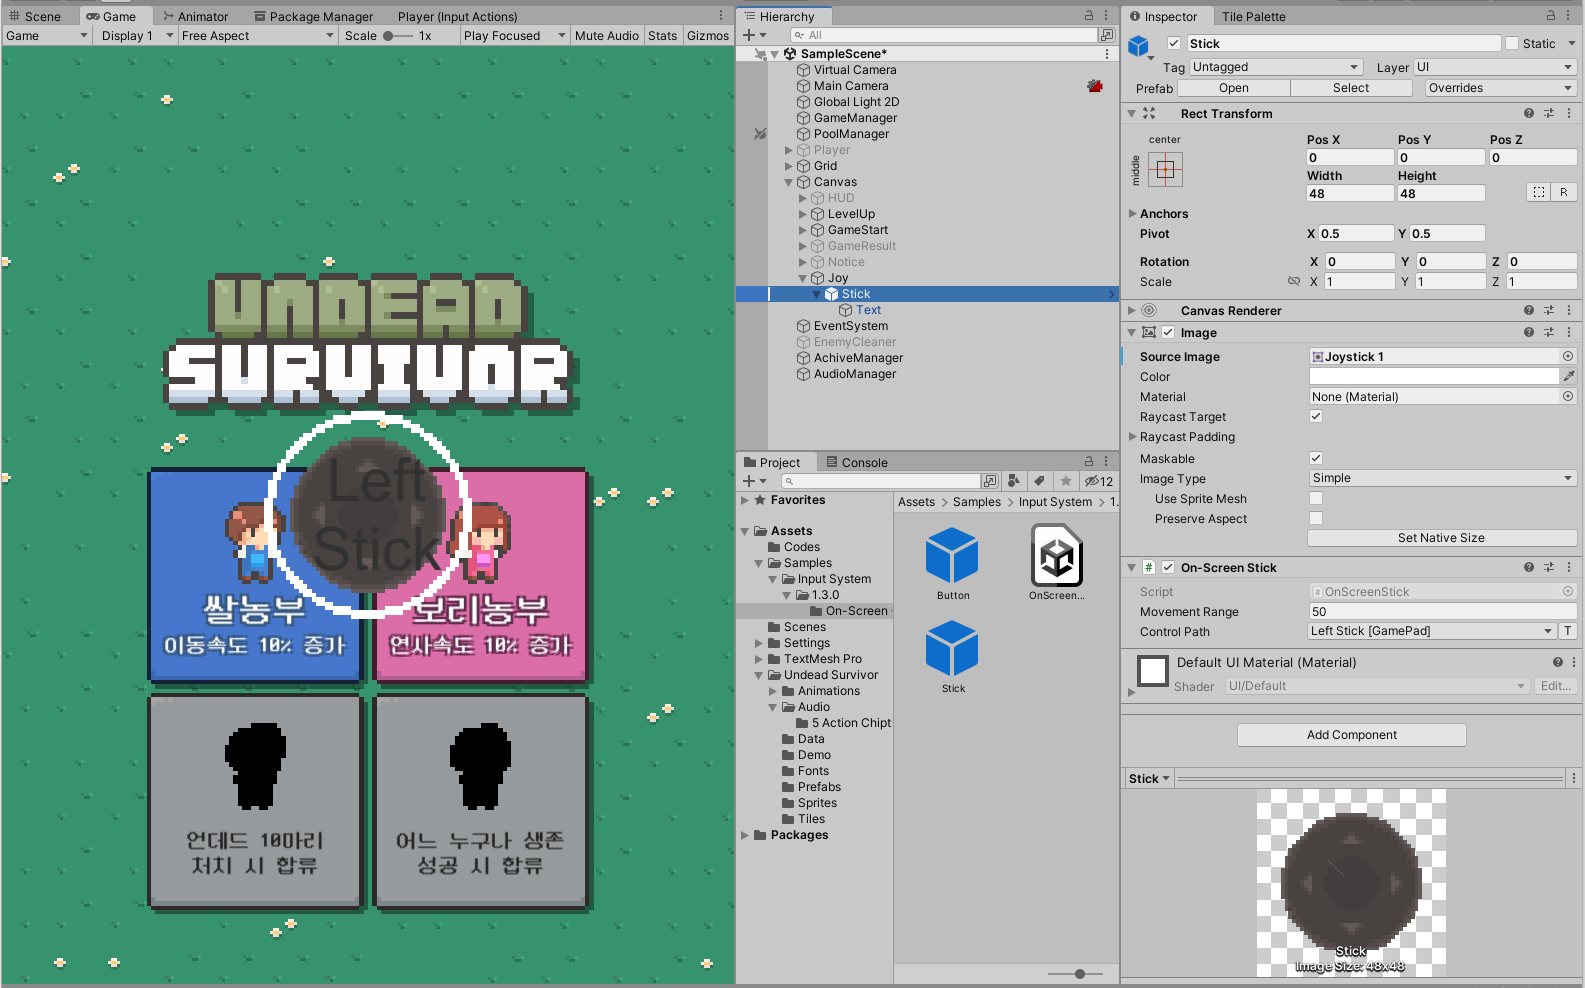
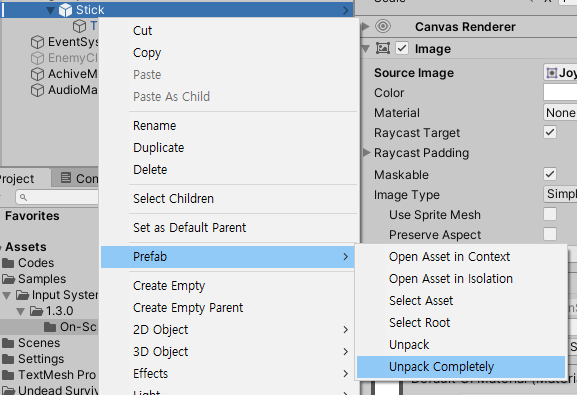
1. 조이스틱 추가
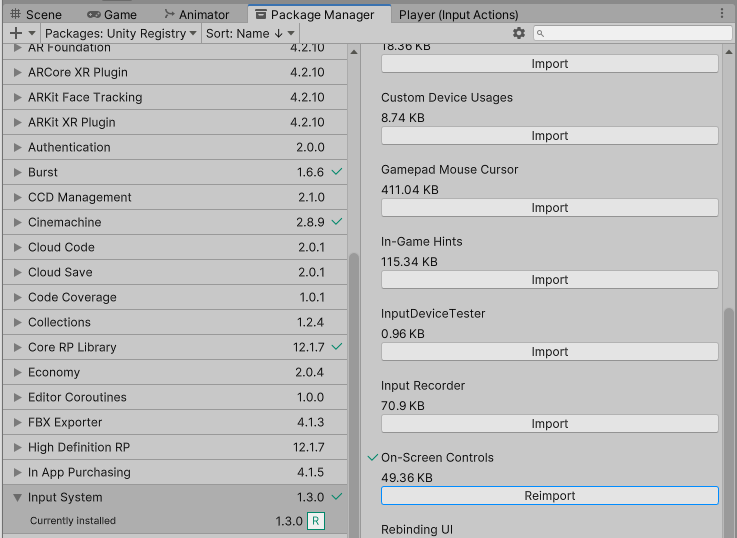


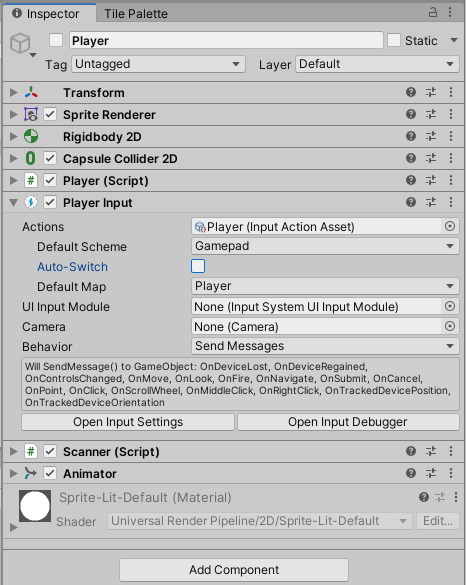
- Auto-Switch : 사용자의 디바이스에 따라서 장치 설정을 바꾸는 설정.
- 현재 게임 테스트 환경에서는 마우스 + 게임 패드를 사용하는 것으로 인식하므로 이동에 방해를 줄 수 있다. 그래서 체크 해제.

//GameManager Script
using System.Collections;
using System.Collections.Generic;
using UnityEngine;
using UnityEngine.SceneManagement; //장면 관리(Scene Manager 같은)를 사용하기 위한 네임스페이스.
public class GameManager : MonoBehaviour {
public static GameManager instance;
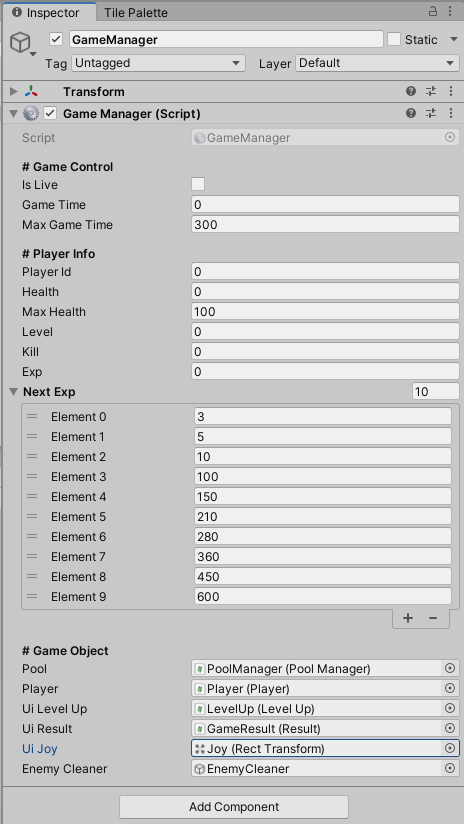
[Header("# Game Control")]
public bool isLive; //시간 정지 여부 확인 변수
public float gameTime; //게임 시간 변수
public float maxGameTime = 2 * 10f; //최대 게임 시간 변수(20초).
[Header("# Player Info")]
public int playerId;
public float health;
public float maxHealth = 100;
public int level;
public int kill;
public int exp;
public int[] nextExp = { 3, 5, 10, 100, 150, 210, 280, 360, 450, 600 };
[Header("# Game Object")]
public PoolManager pool;
public Player player;
public LevelUp uiLevelUp;
public Result uiResult;
public Transform uiJoy;
public GameObject enemyCleaner;
void Awake() {
instance = this;
}
public void GameStart(int id) {
playerId = id;
health = maxHealth;
player.gameObject.SetActive(true);
uiLevelUp.Select(playerId % 2);
Resume();
AudioManager.instance.PlayBgm(true);
AudioManager.instance.PlaySfx(AudioManager.Sfx.Select);
}
public void GameOver() {
StartCoroutine(GameOverRoutine());
}
IEnumerator GameOverRoutine() {
isLive = false;
yield return new WaitForSeconds(0.5f);
uiResult.gameObject.SetActive(true);
uiResult.Lose();
Stop();
AudioManager.instance.PlayBgm(false);
AudioManager.instance.PlaySfx(AudioManager.Sfx.Lose);
}
public void GameVictory() {
StartCoroutine(GameVictoryRoutine());
}
IEnumerator GameVictoryRoutine() {
isLive = false;
enemyCleaner.SetActive(true);
yield return new WaitForSeconds(0.5f);
uiResult.gameObject.SetActive(true);
uiResult.Win();
Stop();
AudioManager.instance.PlayBgm(false);
AudioManager.instance.PlaySfx(AudioManager.Sfx.Win);
}
public void GameRetry() {
SceneManager.LoadScene(0); //LoadScene() : 이름 혹은 인덱스로 장면을 새롭게 부르는 함수
}
void Update() {
if (!isLive)
return;
gameTime += Time.deltaTime;
if (gameTime > maxGameTime) {
gameTime = maxGameTime;
GameVictory();
}
}
public void GetExp() {
if (!isLive) //EnemyCleaner로 경험치를 못얻게 하기 위함
return;
exp++;
if (exp == nextExp[Mathf.Min(level, nextExp.Length - 1)]) {
level++;
exp = 0;
uiLevelUp.Show();
}
}
public void Stop() {
isLive = false;
Time.timeScale = 0;
uiJoy.localScale = Vector3.zero;
}
public void Resume() {
isLive = true;
Time.timeScale = 1; //값이 1보다 크면 그만큼 시간이 빠르게 흐름. 모바일 게임에서 시간 가속하는 것이 이것..
uiJoy.localScale = Vector3.one;
}
}

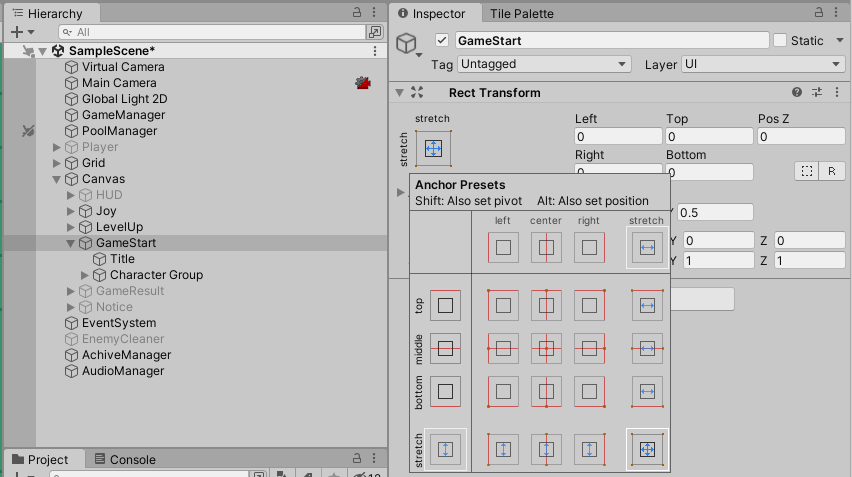
2. 종료버튼 만들기


//GameManager Script

using System.Collections;
using System.Collections.Generic;
using UnityEngine;
using UnityEngine.SceneManagement;	//장면 관리(Scene Manager 같은)를 사용하기 위한 네임스페이스.

public class GameManager : MonoBehaviour {
	public static GameManager instance;
	[Header("# Game Control")]
	public bool isLive;	//시간 정지 여부 확인 변수
	public float gameTime;	//게임 시간 변수
	public float maxGameTime = 2 * 10f; //최대 게임 시간 변수(20초).
	[Header("# Player Info")]
	public int playerId;
	public float health;
	public float maxHealth = 100;
    public int level;
	public int kill;
	public int exp;
	public int[] nextExp = { 3, 5, 10, 100, 150, 210, 280, 360, 450, 600 };
    [Header("# Game Object")]
    public PoolManager pool;
    public Player player;
	public LevelUp uiLevelUp;
	public Result uiResult;
	public Transform uiJoy;
	public GameObject enemyCleaner;

    void Awake() {
		instance = this;
	}

	public void GameStart(int id) {
		playerId = id;
		health = maxHealth;

		player.gameObject.SetActive(true);
		uiLevelUp.Select(playerId % 2);
		Resume();

		AudioManager.instance.PlayBgm(true);
        AudioManager.instance.PlaySfx(AudioManager.Sfx.Select);
    }

	public void GameOver() {
		StartCoroutine(GameOverRoutine());
	}

	IEnumerator GameOverRoutine() {
		isLive = false;

		yield return new WaitForSeconds(0.5f);

		uiResult.gameObject.SetActive(true);
		uiResult.Lose();
		Stop();

        AudioManager.instance.PlayBgm(false);
        AudioManager.instance.PlaySfx(AudioManager.Sfx.Lose);
    }

    public void GameVictory() {
        StartCoroutine(GameVictoryRoutine());
    }

    IEnumerator GameVictoryRoutine() {
        isLive = false;
		enemyCleaner.SetActive(true);

        yield return new WaitForSeconds(0.5f);

        uiResult.gameObject.SetActive(true);
        uiResult.Win();
        Stop();

        AudioManager.instance.PlayBgm(false);
        AudioManager.instance.PlaySfx(AudioManager.Sfx.Win);
    }

    public void GameRetry() {
		SceneManager.LoadScene(0);	//LoadScene() : 이름 혹은 인덱스로 장면을 새롭게 부르는 함수
	}

    public void GameQuit() {
        Application.Quit();
    }

    void Update() {
		if (!isLive)
			return;

		gameTime += Time.deltaTime;

		if (gameTime > maxGameTime) {
			gameTime = maxGameTime;
			GameVictory();
		}
	}

	public void GetExp() {
		if (!isLive)	//EnemyCleaner로 경험치를 못얻게 하기 위함
			return;

		exp++;

		if (exp == nextExp[Mathf.Min(level, nextExp.Length - 1)]) {
			level++;
			exp = 0;
			uiLevelUp.Show();
		}
	}

	public void Stop() {
		isLive = false;
		Time.timeScale = 0;
		uiJoy.localScale = Vector3.zero;
	}

    public void Resume() {
        isLive = true;
        Time.timeScale = 1; //값이 1보다 크면 그만큼 시간이 빠르게 흐름. 모바일 게임에서 시간 가속하는 것이 이것..
        uiJoy.localScale = Vector3.one;
    }
}
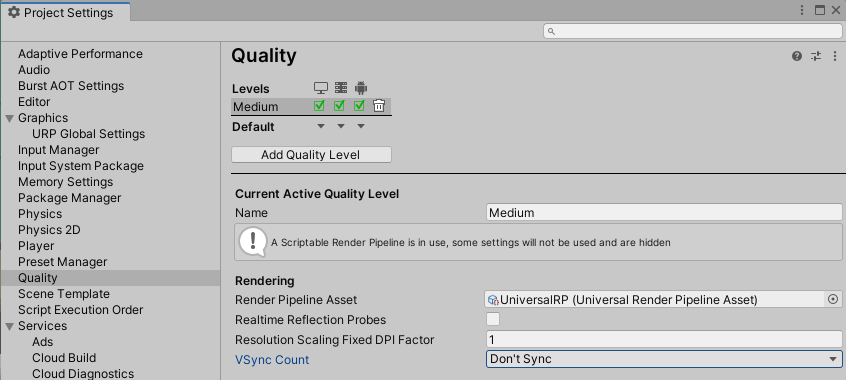
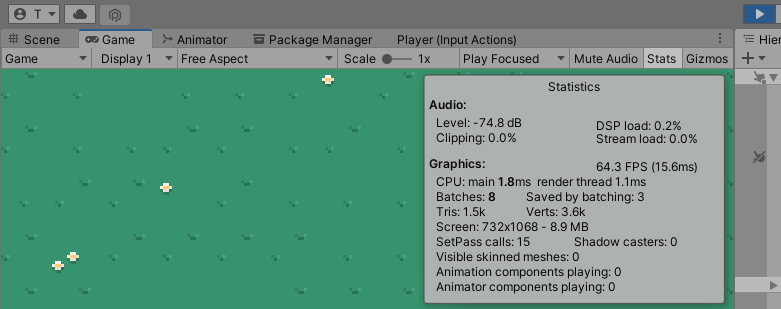
3. 렌더러와 프레임 지정
//GameManager Script

using System.Collections;
using System.Collections.Generic;
using UnityEngine;
using UnityEngine.SceneManagement;	//장면 관리(Scene Manager 같은)를 사용하기 위한 네임스페이스.

public class GameManager : MonoBehaviour {
	public static GameManager instance;
	[Header("# Game Control")]
	public bool isLive;	//시간 정지 여부 확인 변수
	public float gameTime;	//게임 시간 변수
	public float maxGameTime = 2 * 10f; //최대 게임 시간 변수(20초).
	[Header("# Player Info")]
	public int playerId;
	public float health;
	public float maxHealth = 100;
    public int level;
	public int kill;
	public int exp;
	public int[] nextExp = { 3, 5, 10, 100, 150, 210, 280, 360, 450, 600 };
    [Header("# Game Object")]
    public PoolManager pool;
    public Player player;
	public LevelUp uiLevelUp;
	public Result uiResult;
	public Transform uiJoy;
	public GameObject enemyCleaner;

    void Awake() {
		instance = this;
		Application.targetFrameRate = 60;
	}

	public void GameStart(int id) {
		playerId = id;
		health = maxHealth;

		player.gameObject.SetActive(true);
		uiLevelUp.Select(playerId % 2);
		Resume();

		AudioManager.instance.PlayBgm(true);
        AudioManager.instance.PlaySfx(AudioManager.Sfx.Select);
    }

	public void GameOver() {
		StartCoroutine(GameOverRoutine());
	}

	IEnumerator GameOverRoutine() {
		isLive = false;

		yield return new WaitForSeconds(0.5f);

		uiResult.gameObject.SetActive(true);
		uiResult.Lose();
		Stop();

        AudioManager.instance.PlayBgm(false);
        AudioManager.instance.PlaySfx(AudioManager.Sfx.Lose);
    }

    public void GameVictory() {
        StartCoroutine(GameVictoryRoutine());
    }

    IEnumerator GameVictoryRoutine() {
        isLive = false;
		enemyCleaner.SetActive(true);

        yield return new WaitForSeconds(0.5f);

        uiResult.gameObject.SetActive(true);
        uiResult.Win();
        Stop();

        AudioManager.instance.PlayBgm(false);
        AudioManager.instance.PlaySfx(AudioManager.Sfx.Win);
    }

    public void GameRetry() {
		SceneManager.LoadScene(0);	//LoadScene() : 이름 혹은 인덱스로 장면을 새롭게 부르는 함수
	}

    public void GameQuit() {
        Application.Quit();
    }

    void Update() {
		if (!isLive)
			return;

		gameTime += Time.deltaTime;

		if (gameTime > maxGameTime) {
			gameTime = maxGameTime;
			GameVictory();
		}
	}

	public void GetExp() {
		if (!isLive)	//EnemyCleaner로 경험치를 못얻게 하기 위함
			return;

		exp++;

		if (exp == nextExp[Mathf.Min(level, nextExp.Length - 1)]) {
			level++;
			exp = 0;
			uiLevelUp.Show();
		}
	}

	public void Stop() {
		isLive = false;
		Time.timeScale = 0;
		uiJoy.localScale = Vector3.zero;
	}

    public void Resume() {
        isLive = true;
        Time.timeScale = 1; //값이 1보다 크면 그만큼 시간이 빠르게 흐름. 모바일 게임에서 시간 가속하는 것이 이것..
        uiJoy.localScale = Vector3.one;
    }
}
4. 포스트 프로세싱


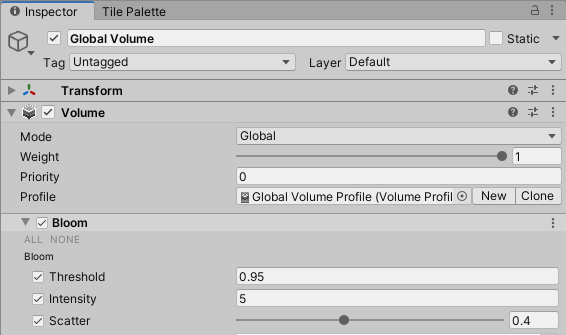
- Bloom : 빛 번짐 효과
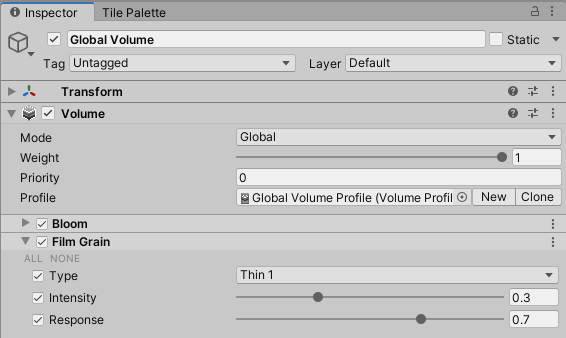
- Film Grain : 필름 노이즈 효과

- Vignette : 모서리 음영 처리 효과


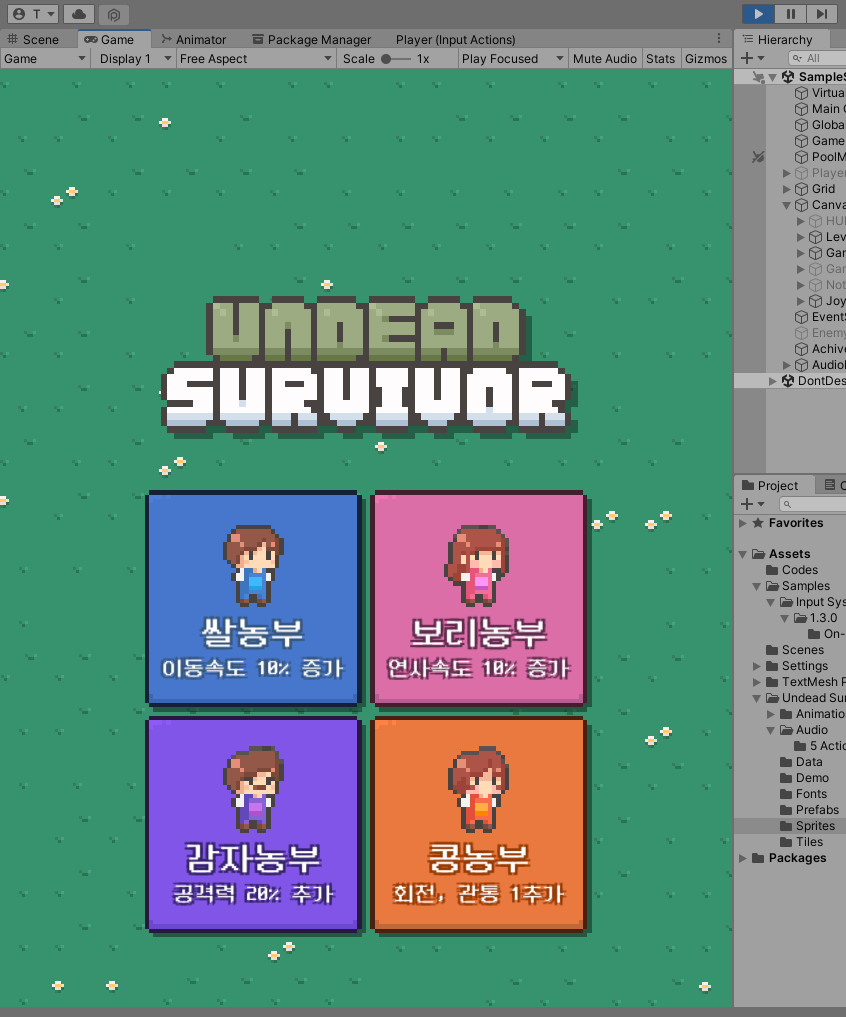
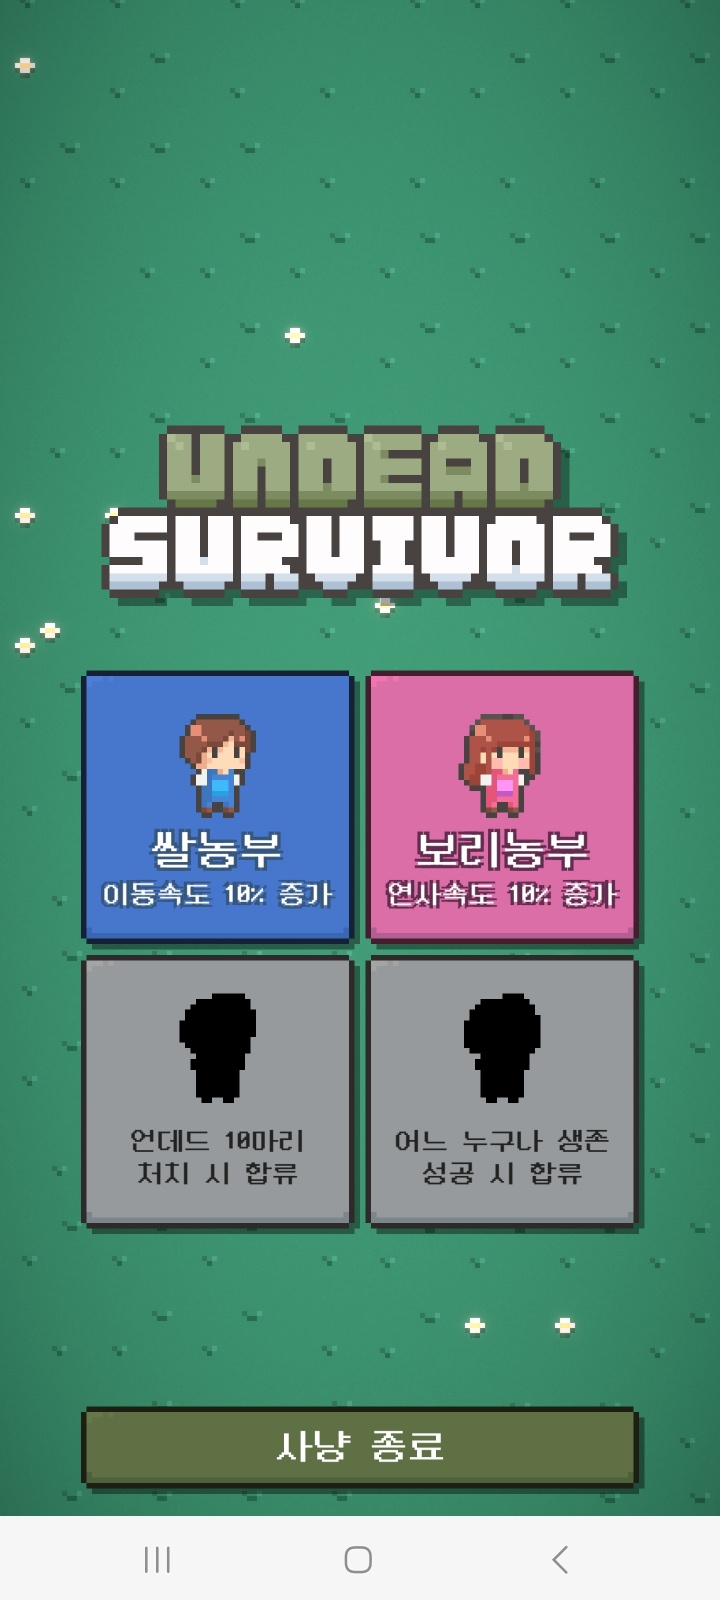
5. 모바일 시뮬레이터


- 이를 이용해서 모바일 기기별로 UI가 깨지거나, 어색한 부분을 수정할 수 있다.
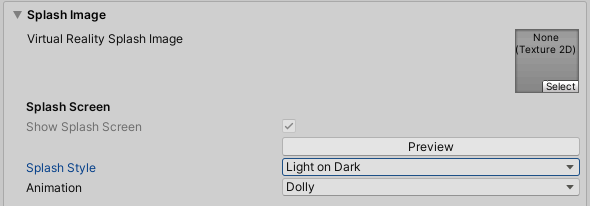
6. 모바일 빌드

- Build Settings 화면 상 왼쪽 아랫부분의 Player Settings... 버튼을 클릭해서 아래와 같은 변경 사항들을 입력한다.

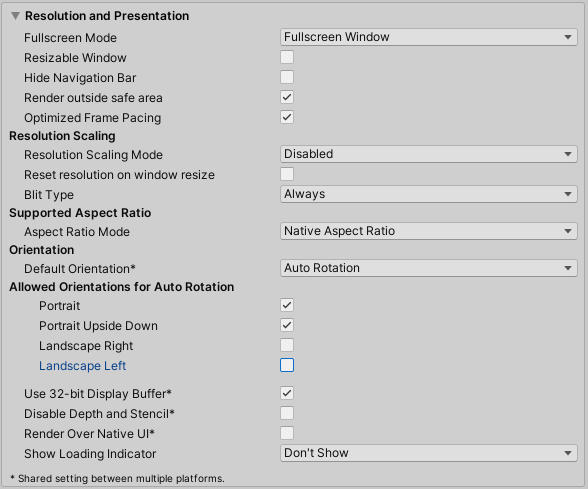
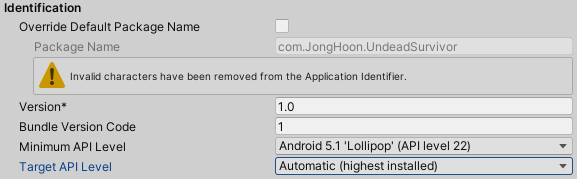
- Target API Level은 사용하는 유니티 버전이 너무 낮을 경우, Automatic 보다는 직접 설정하는 것이 안전하다고 한다.

- 64비트로 빌드할 것이기 때문에 위 설정은 필수적으로 진행해야 한다.
- 또한 구글 플레이 스토어에 등록할때도 해당 세팅은 꼭 필요하다고 한다.

- 티스토리 파일은 20MB까지만 업로드 가능해서 아래 구글 드라이브 링크를 따로 만들었다.
- apk 파일 링크 : https://drive.google.com/file/d/1JnsoO9rX6pfwDI2rd3MBYpE8U4mOQ6Th/view?usp=sharing
Undead Survivor.apk
drive.google.com

+) 번외 : 무기가 목표물을 바라보도록 만들기
https://youtu.be/NE5j8YmJ5Ds?si=SaGvi99BzeJlEUlk
- 앞선 시간에 했었던 강좌 11+ 영상의 댓글을 보면, 골드메탈님이 총이 목표물을 바라보도록 설정하는 코드를 남겨주셨다.

- 이를 이용해서 마지막으로 무기가 목표물을 바라보도록 만들 것이다.
- 댓글처럼 저 부분만 추가해서 작동하지는 않는다. 답글처럼 player변수가 SpriteRenderer로 되어있어서, Player 변수를 따로 선언해서 해결해야한다. 아래 내가 작성한 스크립트는 따로 변수를 선언해서 해결했다.
- 다만 빌드 이후에 갑자기 생각나서 하는거라 모바일 빌드는 하지 않고 간단하게 에디터 내에서 테스트를 진행했다.
//Hand Script

using System.Collections;
using System.Collections.Generic;
using UnityEngine;

public class Hand : MonoBehaviour {
    public bool isLeft;
    public SpriteRenderer spriter;

    SpriteRenderer player;
    Player p;

    Vector3 rightPos = new Vector3(0.35f, -0.15f, 0);
    Vector3 rightPosReverse = new Vector3(-0.15f, -0.15f, 0);
    Quaternion leftRot = Quaternion.Euler(0, 0, -35);
    Quaternion leftRotReverse = Quaternion.Euler(0, 0, -135);

    void Awake() {
        player = GetComponentsInParent<SpriteRenderer>()[1];
        p = GameManager.instance.player;
    }

    void LateUpdate() {
        bool isReverse = player.flipX;

        if (isLeft) {   //근접 무기
            transform.localRotation = isReverse ? leftRotReverse : leftRot;
            spriter.flipY = isReverse;
            spriter.sortingOrder = isReverse ? 4 : 6;
        }
        else if (p.scanner.nearestTarget) {
            Vector3 targetPos = p.scanner.nearestTarget.position;
            Vector3 dir = targetPos - transform.position;
            transform.localRotation = Quaternion.FromToRotation(Vector3.right, dir);

            bool isRotA = transform.localRotation.eulerAngles.z > 90 && transform.localRotation.eulerAngles.z < 270;
            bool isRotB = transform.localRotation.eulerAngles.z < -90 && transform.localRotation.eulerAngles.z > -270;
            spriter.flipY = isRotA || isRotB;
        }
        else {  //원거리 무기
            transform.localPosition = isReverse ? rightPosReverse : rightPos;
            spriter.flipX = isReverse;
            //spriter.sortingOrder = isReverse ? 6 : 4; //총이 타겟을 따라 다니므로, 잘 보이기 위해 6으로 고정해서 주석 처리.
        }
    }
}
'유니티 프로젝트 > 뱀서라이크' 카테고리의 다른 글
| [Unity/유니티] 기초-뱀서라이크: 로직 보완하기[16] (0) | 2023.08.30 |
|---|---|
| [Unity/유니티] 기초-뱀서라이크: 편리한 오디오 시스템 구축[15] (0) | 2023.07.28 |
| [Unity/유니티] 기초-뱀서라이크: 캐릭터 해금 시스템[14+] (0) | 2023.07.25 |
| [Unity/유니티] 기초-뱀서라이크: 플레이 캐릭터 선택[14] (0) | 2023.07.21 |
| [Unity/유니티] 기초-뱀서라이크: 게임 시작과 종료[13] (0) | 2023.07.18 |


